
Persistent hits are highlighted content search terms that are added to documents during review to draw attention to important words or phrases. For example, they can provide a quick, uniform way to identify and redact specified content, such as Personal Identifiable Information (PII) in documents.
Persistent hits are configured by Project Admins at the project level, and are added to documents by reviewers during document review. They appear for all users in a project both on the document and in the right-hand panel in the review window.
When persistent hits are applied to a document, they act as content search terms, following Everlaw’s standards for content searching and advanced content searches. For example, as with normal content searching, phrases without quotation marks will be treated as an OR search.
This article explains how to add and remove persistent hits at the project level and how to create searches from persistent hits.
If you would instead like to learn how to use existing persistent hits from the review window, visit Using Hit Highlighting to Search Within Documents.
Requirements
You must be a Project Admin to configure persistent highlight categories and terms available in the project.
Access the Persistent Hits page
To view or edit your project's persistent highlight settings, go to Project Management > Project Settings > General > Persistent Hits.
Categories and terms
Persistent hit search terms can be grouped into custom Project Admin-defined categories or listed as uncategorized. In general, conceptually-related highlights should be grouped together, as this will make it easier on your reviewers to navigate through, distinguish, and make sense of the different content hits that might appear in a document. For example, you can group all the relevant people in one category, entities in another, and privileged terms in a third.
Individual terms can belong to multiple categories. This can benefit reviewers by allowing them to evaluate terms within the context of other terms.
Create persistent highlight categories and terms
Required permissions: Project Admin
To manually add a persistent highlight to a project:
- Go to Project Management
> Project Settings,
- Go to General > Persistent Hits.
- [Optional] If you would like to add a new category before adding the new highlight term, select + Add new category.
- The category appears on the page. Type to name it.
-
Select the plus
button below the category you want to add the highlighted term to. Then type the term you want to persistently highlight.
Note
Once created, persistent highlight terms can be moved between categories by dragging and dropping them.
- [Optional] To add another term in the same category, hit Enter on your keyboard.
- When you’re done adding terms, hit Tab on your keyboard, or click elsewhere on the page to stop editing.
Bulk create persistent highlight terms
Required permission: Project Admin
You can also bulk add a list of highlights using any of the following methods:
- Upload a CSV or categories and terms
- Transfer from Search Term Reports (STRs)
- Input text to a category
To bulk add multiple highlights using any one of these methods:
- Go to Project Management
> Project Settings > General > Persistent Hits.
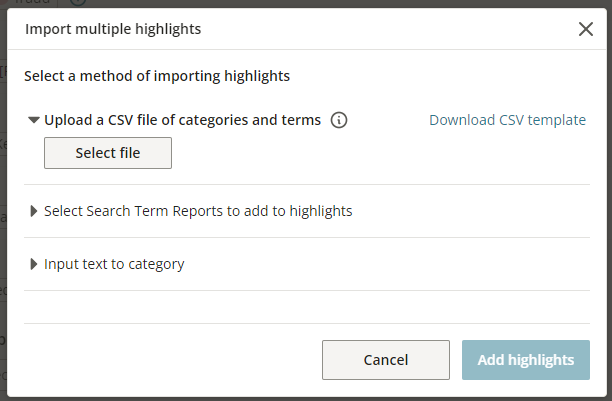
- Select Import list.
The Import multiple highlights dialog appears.
- Select one of the following import options and follow the prompts:
-
Upload a CSV or categories and terms: Upload a CSV from your computer. The CSV must include exactly two columns: Category and Term. For an example, select Download CSV template.
Tip
To reuse persistent hits from a different project, download your list from that project as a CSV and import it into you new project.
- Select Search Term Reports to add to highlights: Pull a list of terms directly from an existing Search Term Report (STR). Select one or more STRs from the list provided. Each report title becomes a persistent highlight category name with the STR’s terms grouped below it. All STR terms, except ones that use logical containers (such as NOT) or metadata, are added.
- Input text to category: Select an existing category to add additional terms to. You can either copy/paste in the desired terms (one per line) into the window or type them manually.
-
- Select Add Highlights.
Create a search from persistent hits
You can create content searches for categories of persistent hits directly from the Persistent Hits tab.
To do this:
- Go to Project Management
> Project Settings > General > Persistent Hits.
- Find the Create search from persistent hits field at the end of the page.
- In this field, select the category or categories you want to search on.
- Click Create Search.
This opens a new results table matching your category-based search.
Add personal information highlights
Required permission: Project Admin
Special content searches to find common patterns of personally identifying information (SSNs, phone numbers, etc.) are grouped together under the Unused category. You must select them from the dropdown and drag them to another category (including the Uncategorized category) if you want them to appear as persistent hits.
You can use smart expressions for PII in persistent hits to further customize the patterns of PII to be highlighted.
When redacting using these using hit highlights, Everlaw has partial redaction options to redact part of these terms to differentiate PII without exposing terms in full. Hit highlight terms that match these PII formats will also have the partial redactions made available. Learn more about how to use partial redactions.
Supported PII formats
| Location | PII types / formats |
| International |
|
| United States (US) |
|
| United Kingdom (UK) |
|
| Australia (AU) |
|
| Canada (CA) |
|
Available PII and partial redaction formats
| PII type | Partial redaction formats and examples |
| Email Addresses (person@domain.com) |
Preceding domain: *******@domain.com Preceding domain, leave first char p******@domain.com Redact domain: person@******** |
| Social Security Numbers (123-45-6789) | All but last 4 digits: ***-**-6789 |
| IP Addresses (192.168.1.255) | All but the last byte: ***.***.**.*255 |
|
Names and addresses (“John Doe”, “57 Applewood Blvd”) Any alphanumeric string |
All but first character: J*** D**, 5* A******** B**** |
| Other numerical PII available as persistent hits above (e.g. IBAN, bank account numbers, ITIN, NHS numbers) | All but last 4 digits: ***-**-6789 |
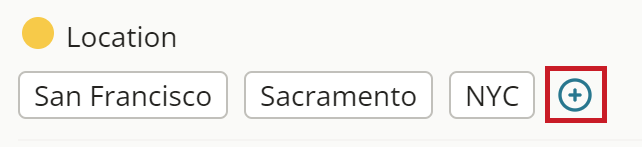
Change a category color
Required permission: Project Admin
Terms in the same category share the same color when rendered in the review window and will be listed together in the hit highlighting panel.
To change the color associated with a highlight:
- Select the color circle associated with the category.
A color picker appears. - Choose a color from the palette.
The color for uncategorized highlights can be adjusted at an individual level. The color for categorized highlights can only be set at the category level.
Remove highlights and categories
Required permission: Project Admin
To remove individual highlights and entire categories:
- Go to Project Management
> Project Settings > General > Persistent Hits.
- Select Delete mode.
- Select the highlight terms and/or categories you want to delete.
Select items receive a red border marking their deletion. - Select Yes to confirm deletion.