
Binders are arbitrary collections of documents. You can use them to group documents together and to share particular sets of documents with other users. A given document can belong to multiple binders.
Requirements
To add or remove documents from a binder, you must have Edit or Full access permission on that binder
To share or delete a binder, you must have Full access permission on that binder
Note
If you have access to a binder, but cannot add or remove documents from it, you do not have the proper permissions to do so. Contact the binder creator to ask for the proper permission.
Create a binder
There are 3 ways to create a binder:
-
From the home page: This approach is recommended if you want to create a set of binders before adding content to them. Binders created from the home page can be named and shared, but documents must be added separately.
To learn how to create a binder from the home page, visit Create a binder from the home page. -
From the batch coding panel: This approach is recommended if you want to automatically batch add multiple documents to the binder you’re creating.
To learn how to create a binder from the batch coding panel, visit Create a binder from the batch coding panel. -
From the review window: This approach is recommended if you want to create a new binder containing the specific document you’re actively reviewing.
To learn how to create a binder from a document’s review window, visit Create a binder from the review window.
Create a binder from the home page
Creating a binder from your project’s home page creates an empty binder. To do this:
- Go to the project’s home page.
- Select the create a new search
button in the Binders column header
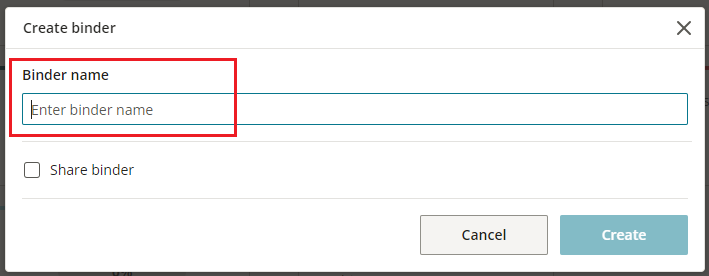
This opens the Create binder dialog. - In the Binder name field, enter a name.
-
For the Share binder field, choose whether or not to share the binder with other users.
If you choose not to share the binder, skip to step 10 (Create).Note
If the option to share a binder is checked by default, a Project Admin has pre-selected recipients.
-
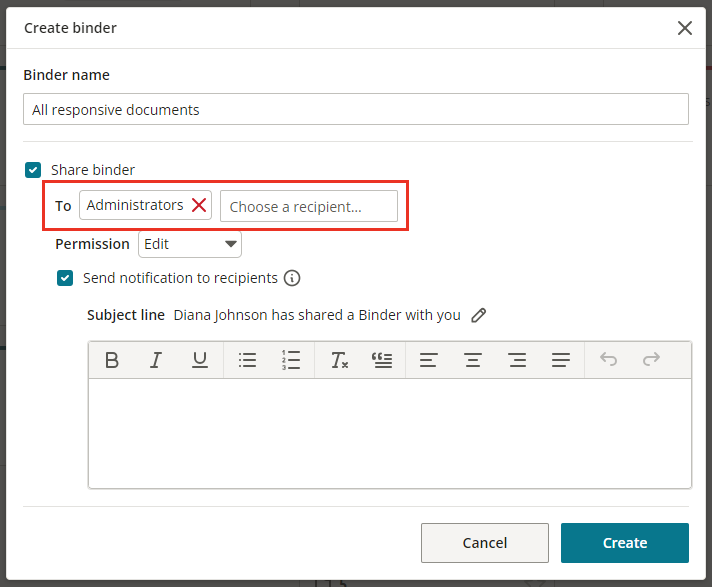
In the To field, type to add recipients and select them from the dropdown menu.
To remove existing receptions, select the remove this entrybutton next to the recipient name.
Note
If your project has the default binder sharing option (configured in Project Settings), you will see the default recipient and permission auto-populated when you create a binder. You may edit the default options, unselect the option to notify recipients, or choose not to share a given binder. To learn more about sharing, visit Sharing and Object Permissions.
- In the Permission field, choose a permission level:
- View: Recipients can view, but not edit, the binder’s documents
- Edit: Recipients can view, add, and remove documents from the binder
- Full access: Recipients can view, edit, share, and delete the binder
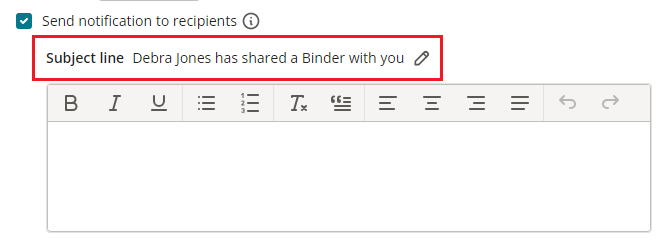
- If you want to send a notification to the binder’s recipients, leave Send notification to recipients checked.
If not, uncheck it, and skip to step 10 (Create). - [Optional] To add a Subject line, click the edit
button next to the suggested subject line. Enter text. Then hit escape on your keyboard.
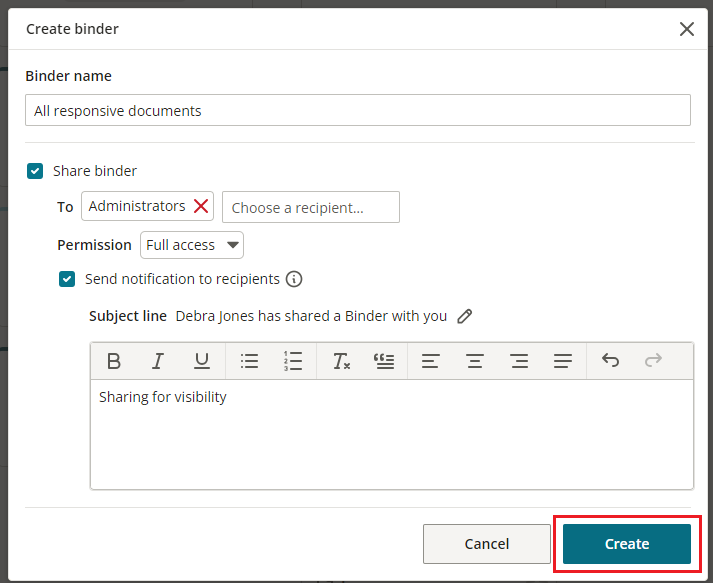
- [Optional] Enter a personalized message in the text box.
- Click Create.
A card for your newly created, empty binder will appear on your homepage and the homepage of any recipients if you shared the binder.
Now what?
- To learn how to add documents to the binder, visit Add documents to a binder.
- To rename, share, update permissions, or delete the binder, click the three-dot menu on the binder card.
Create a binder from the batch coding panel
You can also create a binder in the batch coding panel. To do this:
- Go to your results table.
- Select the documents you want to add to the binder (all documents are selected by default).
- From a search results table, select Batch > Modify.
This opens the batch coding panel. - In the Binders section, select Add a new binder.
- Type a binder name and hit enter on your keyboard.
This opens the Create binder dialog. - In the Binder name field, enter a name.
-
For the Share binder field, choose whether or not to share the binder with other users.
If you choose not to share the binder, skip to step 13 (Create).Note
If the option to share a binder is checked by default, a Project Admin has pre-selected recipients.
-
In the To field, type to add recipients and select them from the dropdown menu.
To remove existing receptions, select the remove this entryNote
If your project has the default binder sharing option (configured in Project Settings), you will see the default recipient and permission auto-populated when you create a binder. You may edit the default options, unselect the option to notify recipients, or choose not to share a given binder. To learn more about sharing, visit Sharing and Object Permissions.
- In the Permission field, choose a permission level:
- View: Recipients can view, but not edit, the binder’s documents
- Edit: Recipients can view, add, and remove documents from the binder
- Full access: Recipients can view, edit, share, and delete the binder
- If you want to send a notification to the binder’s recipients, leave Send notification to recipients checked.
If not, uncheck it, and skip to step 13 (Create). - [optional] To add a Subject line, click the edit
- [Optional] Enter a personalized message in the text box.
- Click Create.
A card for your newly created binder will be available from your homepage and the homepage of any recipients. - In the batch coding panel, click Apply.
All selected documents will be added to the binder.
Create a binder from the review window
You can also create a new binder in the review window coding panel. To do this:
- In the Codes tab, type the new binder name into the coding filter.
This opens a dropdown menu. - In the BINDERS section of the menu, select the checkbox associated with the new name.
- This opens the Create binder dialog.
- In the Binder name field, enter a name.
-
For the Share binder field, choose whether or not to share the binder with other users.
If you choose not to share the binder, skip to step 9.Note
If the option to share a binder is checked by default, a Project Admin has pre-selected recipients.
-
In the To field, type to add recipients and select them from the dropdown menu.
To remove existing receptions, select the remove this entryNote
If your project has the default binder sharing option (configured in Project Settings), you will see the default recipient and permission auto-populated when you create a binder. You may edit the default options, unselect the option to notify recipients, or choose not to share a given binder. To learn more about sharing, visit Sharing and Object Permissions.
- In the Permission field, choose a permission level:
- View: Recipients can view, but not edit, the binder’s documents
- Edit: Recipients can view, add, and remove documents from the binder
- Full access: Recipients can view, edit, share, and delete the binder
- If you want to send a notification to the binder’s recipients, leave Send notification to recipients checked.
If not, uncheck it, and skip to step 10 (Create). - [Optional] To add a Subject line, click the edit
- [Optional] Enter a personalized message in the text box.
- Click Create.
The new binder will become listed in the document’s review window coding panel.
A card for your newly created binder will be available from your homepage and the homepage of any recipients.
Add documents to a binder
There are 3 ways to add documents to an existing binder:
-
From the batch coding panel: This approach is recommended if you want to automatically batch add multiple documents to the binder you’re creating.
To learn how to add documents to a binder from the batch coding panel, visit Add documents from the batch coding panel. -
From the review window coding panel and from the review window coding filter: These two approaches are very similar, and either can be used to add the document you’re actively reviewing to a binder.
If your project contains a large list of codes, ratings, and binder, you may prefer to add the document to the binder using the review window coding filter, which essentially lets you perform a search on the list rather than having you scan select from a complete list.- To learn how to add documents to a binder from the review window coding panel, visit Add a document from the review window coding panel.
- To learn how to add documents to a binder from the review window coding filter, visit Add a document from the review window coding filter.
Add documents from the batch coding panel
To add documents to an existing binder from the batch coding panel:
- Open the results table.
- Select the documents you want to add to the binder (all documents are selected by default).
- Select Batch > Modify.
This opens the batch coding panel. - In the Binders section, select the binder you want to add documents to.
- Click Apply.
Note
If you would like to create a new binder from the batch coding panel, visit Create a binder from the batch coding panel.
Add a document from the review window coding panel
To add a document to a binder in the review window coding panel:
- Go to the review window’s Codes tab.
- In the tab's Everything Else section, click Binders.
- Select the binder(s) to which you want to add the document.
Note
If you would like to create a new binder from a document’s review window, visit Create a binder from the review window.
Add a document from the review window coding filter
To add a document to a binder using the review window coding filter:
- Go to the review window’s Codes tab.
- Type the new binder name into the coding filter.
This opens a dropdown menu. - In the BINDERS section of the menu, select the binder(s) to which you want to add the document.
Note
If you would like to create a new binder from a document’s review window, visit Create a binder from the review window.
Remove documents from a binder
Remove a single document
To remove one document from a binder:
- Open the document in the review window.
- In the Codes tab, click the binder name in the review window coding panel.
The binder’s label will become gray instead of white to indicate that the document is no longer part of the binder. When you navigate away from the document or close the review window, your change will be saved and the document will be removed from that binder.
Remove multiple documents
To remove many documents from a binders:
- Open the binder’s documents in the results table.
This can be done by clicking the binder from the homepage or by running a search for the documents in the binder. - Select the documents you want to remove from the list (all documents are selected by default).
- Select Batch > Modify.
This opens the batch coding panel. - Double click on the appropriate binder label(s) in the batch coding panel. The binder label(s) will have a red dotted outline and will also be added to the panel’s Remove section.
- Select Apply.
The documents will be removed from that binder.
Note
If you have access to a binder, but cannot add or remove documents from it, you do not have the proper permissions to do so. Contact the binder creator to ask for the proper permission.
Delete a binder
To delete a binder:
- Go to the home page.
- Click the three-dot menu on the associated binder card.
- Select Delete.
Deleting a binder also removes all documents from that binder. However, the documents themselves are not deleted.
Share a binder
Permission options
You can share a binder when you create it or afterwards. You can share binders with individual users or with groups. When you share a binder, you can control what actions other users take on your binder through the permissions system:
- View: Permits only the specified recipients view the documents in the binder
- Edit: Permits both the recipients add and remove documents from the binder
- Full access: Permission lets the recipients share and/or delete the binder itself, in addition to viewing and editing
Share a binder
When the project-wide binder sharing setting is toggled off, you can share a binder during creation by checking the Share binder checkbox. This expands the dialog and allows you to select one or more recipient(s), their permission level, and optionally send them a notification.
To share an existing binder from the homepage:
- Select the three-dot menu in the upper right corner of the binder card.
- Select Share.
This opens the Share binder dialog. - In the To field, type to add recipients and select them from the dropdown menu.
To remove existing receptions, select the remove this entry - In the Permission field, choose a permission level:
- View: Recipients can view, but not edit, the binder’s documents
- Edit: Recipients can view, add, and remove documents from the binder
-
Full access: Recipients can view, edit, share, and delete the binder
-
[Optional] If you would like to share the binder without sending its recipients a notification, uncheck Send notification to recipients. Then select Share without notifying to complete this action and close the dialog.
Otherwise, continue to the next step. - [Optional] To edit the notification subject line, select the edit
- [Optional] Enter a personalized message in the text box.
- Click Share and notify.
Binders vs. searches
Searches have a static inclusion criteria, but the set of documents returned by a search will change as the documents change (as you refresh the search).
For example, if you code 100 documents with the code Responsive and then add them to a binder, the binder will contain all 100 documents even if you later remove the Responsive code from a few of them. In contrast, a new or refreshed search for documents coded Responsive will return only the documents coded Responsive.
Searches are only visible to you, their creator, by default. Binders are only shared upon creation if the option to share is selected. To collaborate with others, you need to share these objects and configure the desired permissions.
Binders vs. assignments
It's possible to use binders to allocate a defined set of documents to a reviewer. To do this, share the binder with the reviewer and ask them to review each document.
However, assignments offer an advantage over binders if you are interested in any of the following:
- Tracking progress across individual assignment batches and entire assignment groups
- Automating assignment workflows and creating linked assignments
- Assigning out a set of documents to multiple reviewers
- Designating specific criteria by which documents are considered reviewed
- Changing the criteria by which documents are considered reviewed in order to set review rules
- Allowing reviewers to self-assign documents from a pool of unassigned documents
Walk Me in-platform tutorial
You can learn more about binder use in-platform by clicking Walk Me Through in the bottom right of your screen. (If you have disabled the Walk Me Through panel, you can enable it by clicking the help icon in the navigation bar. In the help overlay, toggle Display Walkthrough Menu.)
With the Everlaw Walkthroughs panel open, you can then choose between several binder-related walkthroughs, including Create a Binder, Add Documents to a Binder, Share a Binder, or Delete a Binder. All are located under the Binders section.